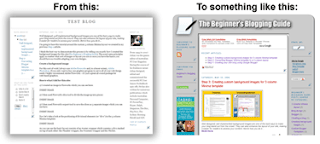
I think the best way to demonstrate this process is by telling you exactly how I created the background images for this site (The Beginner’s Blogging Guide). The exact same principles apply no matter what sort of images or layout you use so once you have the basics you should have no trouble adapting your own designs.
Create a background image
For this sort of work I always use Adobe Fireworks and, to a lesser extent, Adobe Photoshop. If you only want to buy one graphics program to serve all of your web design needs I highly recommend Adobe Fireworks – it’s just a great all-round package for web-based graphics.
Here’s what I did for this site:
1) I created an image in Fireworks which you can see here:
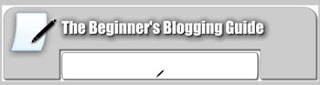
The original background image
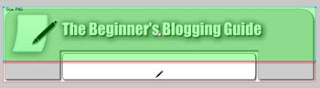
Slice the image up
You end up with 3 separate images
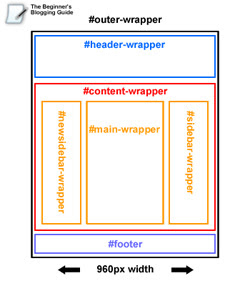
Div layout of 3 column Minima template
You’ll also notice that the middle div (#content-wrapper) contains the 3 columns we created in my previous post (Converting Blogger Minima template to a 3 column layout).
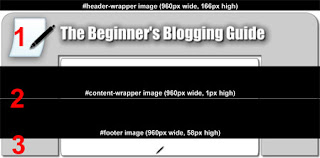
The 3 images I created will be placed as backgrounds for the following div elements:
1) #header-wrapper – “blog_layout_top.jpg” (width 960px, height 166px)
2) #content-wrapper – “blog_layout_middle.jpg” (width 960px, height 1px)
3) #footer – “blog_layout_bttm.jpg” (width 960px, height 58px)
OK – for the purposes of this article, let’s assume that you have already created your own set of background images, exactly the same as those above.
So how do we actually incorporate these 3 images into our blog?
While you can easily upload your #header-wrapper or banner image (blog_layout_top.jpg) using the Blogger Layout Editor, you will need to set up a webhost where you can store your other two background images (blog_layout_middle.jpg and blog_layout_bttm.jpg). Let’s do that now.
Setting up a host directory in Google Page Creator
Go to Google Page Creator and login using your Google account details (the same details you use for Blogger). The first time you login to Page Creator you will be given the option of creating a site based on your Gmail address. Do this now. Don’t worry about how it looks; the important thing is you will soon have somewhere (free) to host your image files.
Your site URL will be “http://YOUR_GMAIL_ADDRESS.googlepages.com/” and you should end up at this page:
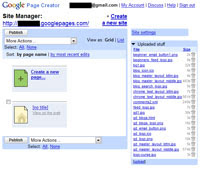
Your Google web files
OK, next we will need to tweak the 3 column Minima Blogger template.
Adjusting the Minima Blogger template
If you haven’t already – make sure you save a backup copy of your Blogger template to your hard drive. Now go to the Layout Editor and click “Edit HTML.”
Scroll down your Blogger template until you find the following code (the blue text):
#header-wrapper { width:960px; margin:0 auto 0px; border:1px solid $bordercolor; } #header-inner { background-position: center; margin-left: auto; margin-right: auto; } #header { margin: 5px; border: 1px solid $bordercolor; text-align: center; color:$pagetitlecolor; } #header h1 { margin:5px 5px 0; padding:15px 20px .25em; line-height:1.2em; text-transform:uppercase; letter-spacing:.2em; font: $pagetitlefont; } #header a { color:$pagetitlecolor; text-decoration:none; } #header a:hover { color:$pagetitlecolor; } #header .description { margin:0 5px 5px; padding:0 20px 15px; max-width:700px; text-transform:uppercase; letter-spacing:.2em; line-height: 1.4em; font: $descriptionfont; color: $descriptioncolor; } #header img { margin-$startSide: auto; margin-$endSide: auto; } |
|---|
Delete all of it (the blue text above) and replace it with the following code (the red text):
#header-wrapper { width:960px; height: 166px; margin:0 auto 0px; } #header img { margin-$startSide: auto; margin-$endSide: auto; } |
|---|
What did we just do?
1) We deleted all of Blogger’s banner styling and replaced it with a barebones CSS style rule which defines our #header-wrapper as being 960px wide and 166px high.
2) We removed any margins or borders.
Now scroll down your Blogger template until you find the following code (the blue text):
#outer-wrapper { width: 960px; margin:0 auto; padding:0px; text-align:$startSide; font: $bodyfont; } |
|---|
And add this code (the red text) directly below it (REMEMBER - DO NOT REPLACE, ADD IT BELOW):
.clear { clear: both; display: block; overflow: hidden; width: 0; height: 0; } #content-wrapper { width: 960px; background-image: url(http://YOUR_GMAIL_ADDRESS.googlepages.com/blog_layout_middle.jpg); background-repeat: repeat-y; } |
|---|
What did we just do?
1) We added some CCS style rules to the #content-wrapper and defined a background image which will repeat vertically (remember to change the URL of “blog_layout_middle.jpg” so it points to the image on your Google site).
2) We added the .clear CSS style rule so that any content in the #content-wrapper div (i.e. blog posts, sidebar widgets etc.) will push the repeated background image (“blog_layout_middle.jpg”) down the page, giving our layout stylistic continuity.
Now scroll down your Blogger template until you find the following code (the blue text):
#footer { width: 960px; clear: both; margin:0 auto; padding-top:15px; line-height: 1.6em; text-transform:uppercase; letter-spacing:.1em; text-align: center; } |
|---|
and replace it with this (the red text):
#footer { width: 960px; clear: both; background-image: url(http://YOUR_GMAIL_ADDRESS.googlepages.com/blog_layout_bttm.jpg); height: 58px; margin:0 auto; padding-top:0px; line-height: 1.6em; text-transform:normal; letter-spacing:.1em; text-align: center; } |
|---|
What did we just do?
1) We gave the #footer div a height of 58px and defined a background image (remember to change the URL of “blog_layout_bttm.jpg” so it points to the image on your Google site).
2) We removed some padding so our background images line up flush with one another.
Ok now save your template!
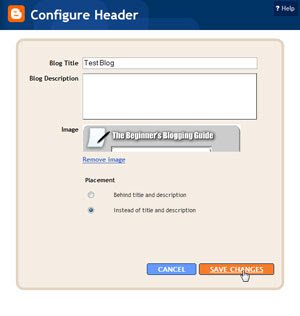
Upload your banner image
Click the “Page Elements” tab and then hit the “Edit” link on the “Header” widget. Now browse to the “blog_layout_top.jpg” image on your hard drive and upload it. Select “Instead of title and description” and then “Save Changes.”
That’s it! Now view your blog and you should see your new background images flowing together into one uniform layout.
Please note: background images are a fantastic way to create a truly unique look for your blog but remember that you will have to adjust the size and margins of your divs to accommodate them.If you have any problems please don’t hesitate to send me an email or post a comment and I will be happy to try and help you.
In my next post I will show you how to create a favicon.ico icon image for your Blogger blog and how to host it on your Google Page Creator site.
Thanks for this tutorial. Really helpful.
ReplyDeletehi,
ReplyDeleteiam trying your direction for making 3 column blogg
Hi Julian. You are the best. This is exactly what I wanted to do. Simply amazing. I have wasted so many hours looking for things on the internet that it is so refreshing to actually find an answer. I wish I could compensate you somehow for saving me probably hours of time. I'd like to when I dig myself out of this debt hole. You don't waste your time or our time. Simple copy paste. I wish more sites would take your example. I will sign on as a follower.
ReplyDeleteThanks!!
I got the 3 column all jiggy, but the bg image only showed on the left and it interfered with the left sidebar content.
ReplyDeleteAny suggestions?
This is my practice blog:http://tobpracticeblog.blogspot.com
Hi theotherbed,
ReplyDeleteI took a look at your practise blog but at the moment you seem to have taken your background image down.
Sounds like you may have set the image background to the wrong div though.
Julian
when i try to save it, it says
ReplyDeleteWe were unable to save your template
Please correct the error below, and submit your template again.
More than one widget was found with id: Profile2. Widget IDs should be unique.
how do i fix this ? thanks!
nvm i fixed it ^^
ReplyDeletethanks for the tutorials!