
Favicons stand out
Favicons are extremely worthwhile for a number of reasons:
- They make your site look more professional.
- They enhance the visual ‘branding’ of your website.
- They provide an intuitive way for web-users to find your site in their Favourites or Bookmarks lists.
- In newer browsers they also make it easier for people to navigate back to your site via tabbed panels.
- If you save your favicons in the Windows Icon (.ico) image format they can also be used as desktop shortcuts for your site.
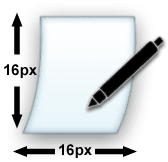
Favicons are small images which are usually 16px by 16px in size. Your site logo would be a natural choice for a favicon. If you find that your logo is too complex to shrink down to 16px by 16px, try stripping out the most recognisable logo elements and using them as a base for your favicon.
Favicons must be created in one of three possible image formats: .ico (Windows Icon), .gif (Graphics Interchange Format) or .png (Portable Networks Graphics). Of these the .ico format is probably the best way to go because all browsers will recognise it.
Create an .ico image
If you don’t own a graphics editing program which supports .ico files you may like to give one of these a try: Sib Icon Studio (an .ico image design studio), Any to Icon (converts most major image formats into .ico files).
If you own Adobe Photoshop you can use the free .ico plugin: Telegraphics Photoshop ICO Format Plugin.
Step 2: upload your .ico image to Google Page Creator
Now you’ll need to copy the .ico file to a host server so you can link to it. If you have a Blogger blog the easiest way to do this is via Google Page Creator.
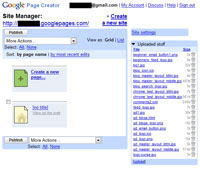
Your Google web files
Your site URL will be “http://YOUR_GMAIL_ADDRESS.googlepages.com/” and you should end up at the page shown in the image above. Now upload your .ico image file and make a note of its URL, it should be something like: “http://YOUR_GMAIL_ADDRESS.googlepages.com/YOUR_ICO_FILENAME.ico”
Step 3: add the favicon HTML to your Blogger site
Now all you need to do is to go into the Blogger Layout Editor and choose the "Edit HTML" option.
Please note: If you haven’t already – make sure you save a backup copy of your Blogger template to your hard drive.
UPDATE!!: The old method of getting a custom favicon to display in a Blogger blog no longer works. As of October 2008 you now need to insert the code in a different area of your Blogger template. I have included the updated method below:
Insert the following code between the ]]></b:skin> and </head> tags in your Blogger template:
<link href='http://YOUR_GMAIL_ADDRESS.googlepages.com/YOUR_ICO_FILENAME.ico' rel='shortcut icon' type='image/x-icon'/> |
|---|
Don’t forget to change the URL so it points to the .ico file on your Google Page Creator site.
Now save your template and view your blog. If your new favicon doesn’t show up straight away you may need to clear your browser cache.
And that's all there is to it!
Thank you again for this too! You're wonderful! Seriously! No one else explained exactly where I was supposed to store the favicon so I could actually upload it.
ReplyDeleteJust an FYI, I tried page creator and Google isn't allowing any new sign-ups. So they redirected me to Google Sites. Just thought you might want to update the post with that info.
Will you be doing a tutorial on a tab bar in the header sometime soon? I'll be sure to do a post soon linking to all these great tutorials. Thanks again!
I have been working on a totally new site for the past couple of months and I may consolidate all of my older blogs into this new site when I'm finished.
ReplyDeleteBy tab bar do you mean a navigational bar - like the Spry menubar I have at the top here? I can do a quick tutorial for you if you are looking to add a navbar.
I wonder why Google have closed off their webpage creator - I'll try to find an alternate free hosting service, thanks for letting me know.
Yes, exactly the navbar that you've got on top. Thanks so much. :)
ReplyDeleteAnd Google Sites is free, so I easily uploaded my favicon to that and installed it just fine.
You probably already know this, but I was playing around with page elements and dragging things around and discovered that I could drag something to the top of my header and have it centered. It did not do that before but only stayed on top of the main content part of the page. So I did that with the "add html" element and was able to have it centered below my header so I made my own navbar. It was so easy. Whatever code it was that you had me do for the 3-column minima now helped me install all the things that I wanted on my blog but could never figure out before. So thank you so much again!
ReplyDeleteThat's excellent - yep the same principles apply to just about all of it.
ReplyDeleteAlso - if you would like to use Spry menus or other widgets try Adobe's Spry page http://labs.adobe.com/technologies/spry/widgets/widgets.html
Excellent post. This is very helpful. Thank you for writing it.
ReplyDeleteNathanKP - Inkweaver Review
Nathan: my pleasure! Thanks for the positive feedback - always appreciated :-)
ReplyDeleteCan you see why mind isn't working? The icon should be a GC logo.
ReplyDeletetest name: I took a look at your source code and I can see two copies of your favicon code in your template. Try removing the old line at the top of the template.
ReplyDeleteAnd secondly - I tried to have a look at the favicon itself at the link on Google pages and I couldn't find it. Is the actual favicon file at the location your link points to?
I will update this post shortly to make sure it's as clear as it can be, and that the steps are the same.
Thanks Julian. I'm confused, because I see different things when I look at my template code vs. when I look at the source code of the page itself. Could you be more specific as to what I need to do?
ReplyDeleteTest name - Yep the source code and the Blogger template look totally different. Ignore the source code for the moment.
ReplyDeleteSecondly, Google Page Creator no longer accepts new sign-ups, so I'm looking at an alternative. The newer Google sites service may not be suitable for hosting your favicon file.
Anyway - quick question - did you upload your favicon (your .ico file) to a host somewhere besides Google Page Creator? Btw - if you'd prefer to continue this via email, feel free to shoot me a message on my contact page. We will get it working!
Thanks again, Julian. I hosted it somewhere else and that seemed to solve the problem. Cheers!
ReplyDeleteTest Name: Excellent! I thought it may have been something like that. I must update this article.
ReplyDeleteHi Julian. Is a very good blog you have here. I wanted to know how to customize the background of a blogger site & found your blog. Is really interesting to know that you can do a lot of customization in a blog which i never knew. Someone told me that I have to buy a domain in order to host the images that I need to use.
ReplyDeleteThanks Julian. :P
You rock! Thank you so much!!!!
ReplyDeletegoogles-pages will close in june.
ReplyDeleteWhat's about google-sites?
Best regards
Bernhard
Dear it's good tips but it's not working for me , i mean, i am unable to do this.
ReplyDeleteCan i except help from you ?
Thanks,
-Amaresh
http://bloghelpforbegineers.blogspot.com/
http://mereprabhusmj.blogspot.com/
Hi Amaresh,
ReplyDeleteWhat seems to be the problem mate?
Have you created an ico file for your Favicon?
Have you hosted this file somewhere?
Let me know and I'll try to help.
Cheers
Julian
google pages r going down forever this month... where can i upload it?
ReplyDeleteTry Google sites mate - http://sites.google.com
ReplyDeleteThanks for the tip about the Photoshop plugin.
ReplyDelete