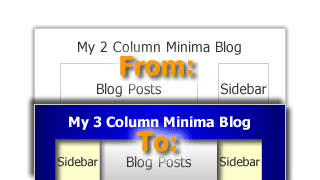
Adding a new column to the Minima Blogger template
Many Blogger templates are set up for a screen resolution of 800 by 600. In recent months when analysing the stats of my sites (using Google Analytics and Feedburner) I haven’t come across anyone who still uses this old resolution. With this in mind I think it’s safe to reconfigure our sites to suit a minimum screen resolution of 1024 by 768. However it’s always a good idea to leave a little space for browser chrome (the extra space used by browser scroll bars etc.), so I think that a width of 960 pixels is about perfect.
OK let's do it! Select the Blogger "Layout" option and then "Edit HTML." Now scroll down until you find the following code (the blue text):
#outer-wrapper { width: 660px; margin:0 auto; padding:10px; text-align:$startSide; font: $bodyfont; } #main-wrapper { width: 410px; float: $startSide; word-wrap: break-word; /* fix for long text breaking sidebar float in IE */ overflow: hidden; /* fix for long non-text content breaking IE sidebar float */ } #sidebar-wrapper { width: 220px; float: $endSide; word-wrap: break-word; /* fix for long text breaking sidebar float in IE */ overflow: hidden; /* fix for long non-text content breaking IE sidebar float */ } |
|---|
This code defines the outermost, surrounding wrapper (#outer-wrapper), the area where your posts will go (#main-wrapper) and a sidebar (#sidebar-wrapper).
Now replace the above code (the blue text) with the following code (the red text):
.clear { clear: both; display: block; overflow: hidden; width: 0; height: 0; } #outer-wrapper { width: 960px; margin:0 auto; padding:0px; text-align:$startSide; font: $bodyfont; } #main-wrapper { width: 569px; margin-right: 15px; margin-left: 20px; text-align: left; float: left; word-wrap: break-word; /* fix for long text breaking sidebar float in IE */ overflow: hidden; /* fix for long non-text content breaking IE sidebar float */ } #sidebar-wrapper { width: 133px; margin-left: 20px; margin-right: 25px; float: right; word-wrap: nowrap; /* fix for long text breaking sidebar float in IE */ overflow: hidden; /* fix for long non-text content breaking IE sidebar float */ } #newsidebar-wrapper { width: 133px; margin-left: 30px; margin-right: 15px; float: left; word-wrap: nowrap; /* fix for long text breaking sidebar float in IE */ overflow: hidden; /* fix for long non-text content breaking IE sidebar float */ } |
|---|
So what did we just do?
- We defined style rules for a clearance div class (.clear).
- We defined an additional sidebar (#newsidebar-wrapper).
- We changed the width of the #outer-wrapper to 960px.
- We changed the width of the #main-wrapper to 604px (including margins).
- We changed the widths of the 2 sidebars to 178px (including margins).
- We floated one sidebar and the #main-wrapper (where your posts appear) to the left and one sidebar to the right.
- We also added some margins for content alignment.
Changing the widths of the header and footer
We should now adjust the widths of the #header-wrapper (where your banner image resides) and #footer (where you can put copyright information or anything else you like) to match the other widths.
Scroll down your Blogger template until you find the #header-wrapper code (the blue text):
#header-wrapper { width:660px; margin:0 auto 10px; border:1px solid $bordercolor; } |
|---|
and replace it with this (the red text):
#header-wrapper { width:960px; margin:0 auto 0px; border:1px solid $bordercolor; } |
|---|
OK now scroll down your Blogger template until you find the #footer code (the blue text):
#footer { width:660px; clear:both; margin:0 auto; padding-top:15px; line-height: 1.6em; text-transform:uppercase; letter-spacing:.1em; text-align: center; } |
|---|
and replace it with this (the red text):
#footer { width:960px; clear:both; margin:0 auto; padding-top:15px; line-height: 1.6em; text-transform:uppercase; letter-spacing:.1em; text-align: center; } |
|---|
The final step: centering your blog posts
Now all we need to do is add one final piece of code to the Blogger template. This will configure your newly customised Minima template to position your blog posts between the 2 sidebars.
OK now scroll down your Blogger template until you find the following code (the blue text):
<div id='main-wrapper'> <b:section class='main' id='main' showaddelement='no'> <b:widget id='Blog1' locked='true' title='Blog Posts' type='Blog'/> </b:section> </div> |
|---|
And add this code (the red text) directly above it (REMEMBER - DO NOT REPLACE, ADD IT ABOVE):
<div id='newsidebar-wrapper'> <b:section class='sidebar' id='newsidebar' preferred='yes'> <b:widget id='Profile2' locked='false' title='About Me' type='Profile'/> </b:section> </div> |
|---|
Earlier in this tutorial we added the “float: left” style rule to the #newsidebar-wrapper. By placing the above code before #main-wrapper (which also has the “float: left” style rule), we are telling the browser to display the #newsidebar-wrapper first, then the #main-wrapper, followed by the other #sidebar-wrapper (which has the “float: right” style rule). Or put simply – 3 columns with your blog posts in the centre.
Update (Feb 22 2009): Recently some people have been having problems with the original 'NewProfile' id - so I have changed it to 'Profile2' - which worked when I tested it in Blogger.
Please note: we have also told the #newsidebar-wrapper to display your Blogger Profile but this can easily be changed using Blogger’s Layout editor.
Now save your template and go into the Layout Editor. It should have changed from this:
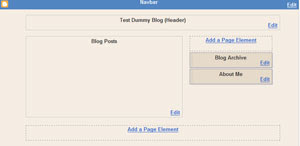
Before...
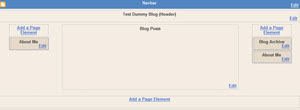
After!
It's also possible to display your blog posts on the left or right (by simply moving some code around in your template - just ask me and I will be more than happy to tell you how).
Update!: if you are having problems implementing your 3 column Minima Blogger layout you might like to check out my recent post - Troubleshooting 3 column Minima layout.
In my next article I'll show you how to "Create custom background images for your 3 column Minima Blogger template."
Thanks a lot! I couldn't find a tutorial that was this easy to understand. Great work, keep it up.
ReplyDeleteThank you so very much! I've been wanting to add a third column forever but every other hack was just impossible for me to figure out. This was easy to understand and easy to customize after I figured it out.
ReplyDeleteMy pleasure! :-)
ReplyDeletei seriously ruined my entire blog with other tutorials but yours got it done. thanks a trillion!!
ReplyDeleteNo problems Scarlet, glad to be of help :-)
ReplyDeleteMy hero of the past few hours!
ReplyDeleteGod bless you!
Thank you for clear and friendly instructions!
By far the best tutorial I have ever come across...I love that it was both easy to follow AND explained what the purpose of each step was. Thank you, I'll be back!
ReplyDeleteYou are the best. After some tinkering I got it to work perfectly. I've been wanting to add a 3rd column for MONTHS!!! You made it simple and easy!!
ReplyDeleteThanks so much for the kind comments guys - I have been a little sidetracked with work lately but I am happy to read that some of my posts have been helpful for people. This sort of feedback makes it all feel worthwhile.
ReplyDeleteI intend to consolidate my blogs soon into a new site I'm doing.
Thanks a lot! It was easy to understand and good for beginner like me1 thanks again!
ReplyDeleteIt's vert amazing templet for blog. so i can use it.
ReplyDeletethanks
I'm an absolute html dummy, but your step-by-step approach guided me through without any hickups.
ReplyDeleteJust what I had been looking for !
Only one thing did not adapt : the main blog title is still centered, but the subtitle is not: it starts at the left margin. Can this be fixed ?
Many thanks for great post !
Jan
Hey man this tutorial rules!! thanks for sharing!!! it helped me a lot. Many thanks.
ReplyDeleteWoo hoo! Thanks SOOOO much for this. I have just, within 30 minutes, updated my template and tweaked it to my liking, thanks to your simple, easy-to-follow instructions.
ReplyDeleteI have you some link love in today's post — awesome job, and many thanks!
Hello, I would like to have the blogs on one side and then the 2 smaller columns together. How do I do this?
ReplyDeleteI have to add my thanks too! I have wanted to add a third column for a while. After trying a few others, I finally found your instructions. By far the easiest to read and understand. Worked like a charm the very first time! Bravo!
ReplyDeleteGreat post! Thanks for the help!
ReplyDeleteCan you explain how to display your blogposts on the left,in other words how to add an extra sidebar on the extreme left? (Like Wandering Chopsticks blog) Thanks for your help!
ReplyDeleteOops, I meant 'extreme right'. Thanks again. (My site: healingphilosophy.com)
ReplyDeleteHi, I was previously using the rounders template w/ a 3 column layout. I wanted to change to use the Minima template in instead. I changed to the Minima template then followed your instructions but screwed something up.
ReplyDeleteI was getting both sidebars but the center blog post box was completely missing. I tried to change back to my prior template but when uploading blogger is giving me error messages. I was able to get it back to a two column format.
Any idea why the post box would disappear? Thanks.
I followed the directions and everything turned out great except that I don't have a header anymore. Any ideas?
ReplyDeleteThanks!
Thanks, it worked!
ReplyDeleteOMG this is fabulous info. I will get to work on it tomorrow! I'll come back and let you know how fantastic it is. Thanks for the tip!
ReplyDeleteHi, can you please tell me what did I do wrong with my post header & post date got switch somehow? thanks :)
ReplyDeleteLife through the eyes of an 8 year old:
ReplyDeleteYou may have either accidentally deleted the header-wrapper css or the actual code - hard to know which unless I can take a look.
I know this is annoyingly obvious but just remember to backup your template before you tweak it and you if you follow the instructions you should get it the way you want it eventually.
Trial and error is how I learn.
If you are really stuck shoot me an email and I'll have a look at it for you.
Lisa:
ReplyDeleteSorry to hear that but it's impossible to know what happened unless I can see the template code.
Just restore your backup template and have another go until you get it working.
Once again if you are really stuck - shoot me an email and I'll try to help.
Hey there - this is by far the closest I've gotten, but my right side bar is floating at the bottom of the page - what did I do wrong? Help!
ReplyDeletesouthernaccent:
ReplyDeleteIf your right sidebar pops down underneath that generally means that your width, margins and padding may be making the columns too wide to fit inside the containing wrapper.
Check the widths again - remember the combined widths of the 3 sidebars (plus their margin and padding) must be equal to or less than the width of the #outer-wrapper.
Remember - if you have a sidebar which is 300px wide with 20px of left and right padding and 20px left and right margins - then that is 300px + 20px + 20px + 20px + 20px = total width of 380px.
If the floating containers are too wide they generally pop down underneath - so check width/padding/margins.
Your explanation was dead-on and easier than most I've read. However, there is one problem I've been dealing with...browswer compatiblity. If you use Firefox, you cannot view the 3rd column, and same for IE8 (unless in compatibility mode). IE7 and below views fine. While the majority of my readers use IE7, 30% use Firefox and a smaller percentage use Safari. I'm guessing this has to do with margins and/or padding in order for the browser to render the page correctly. Any suggestions?
ReplyDeletekeith: it could well be margins and padding etc. You might like to check out my Troubleshooting 3 column Minima layout and maybe post the URL or email it to me so I can have a look at the problem in action.
ReplyDeleteHi Julian, thanks for the response. I did go through your troubleshooting tips and made sure that my margins were factored into the outside wrapper and footer. I know you're going to say that it might be because I use a wider wrapper than described in your post, but the same thing occurs even when I use your dimensions. It's still best viewed in IE7 or IE8 in compatiblity mode. Firefox and Safari (and Chrome for that matter) don't render the 3rd column and push it down below the post. Anyway, my site is www.partyfavorz.net if you want to check it out and see what I might be doing wrong. Frankly, I'm at my wits end and have been pulling my hair out on this issue all year long. Any suggestions would not only be welcome, but greatly appreciated.
ReplyDeleteHi again keith,
ReplyDeleteI took a look at your site and it looks fine to me - I can see 3 columns in IE and Firefox. As for the dimensions - they don't matter so long as everything fits. What screen resolution are you running in? I use 1680 by 1050. However if you display a wide layout on a small screen res, I'm not sure what would happen. This is a tricky one.
Julian, I'm using 1680 x 1050 as well. Thanks for checking it out, as you can see I still need to go back and re-add all my widgets (so much for backing them up...ugh). Anyway, I just did your fixes this morning and checked it in IE8 without compatibility mode, and guess what? IT WORKS! Yeah! Of course, now I'll hear back from people that they can't see it properly on their PDA...in which case I'll just throw in the towel...LOL. I'll go back and check it out later in a lower resolution. It seems there's some site where I can do that; I'll have to look it up. Thanks again...you're the BEST!
ReplyDeletekeith: the other option you have is to go the 'liquid layout' route where you use percentages for column and container widths (i.e. 25% 40% 25%) - the idea being that the layout will resize correctly in any resolution. I might do a post about that method down the track. One final thing - with floating columns, make sure you have a clearance div straight after the last float - one with the clear:both; style rule. This can stop the float popping down underneath.
ReplyDeleteOMG!!!!!! I didn't think it would work! It worked! I spent hours yesterday following tutorials and yours worked! I LOVE YOU! Thank you so much! I feel like crying! OMG! You deserve an award!!!!! Thank you so much!!!! Please visit my blog you wonderful person!
ReplyDeleteSweedy
A.K.A
Eduardo the Snuggle Puggle
(I have a dog blog)
It wont let any of my posts show up now plz help commet whats wrong on this site http://sillyman90.wordpress.com
ReplyDeleteThanks Eduardo - I will certainly check your blog out!
ReplyDeleteSillyman90: I would say that in the Step "Centering your Blog Posts" you probably accidentally REPLACED the main-wrapper with the newsidebar-wrapper.
Instead you need to put the newsidebar-wrapper directly above the main-wrapper in your template.
Fantastic HELP!!!! Thank you so much ~ I am not at all savy in this area and was able to make the change from 2 column to 3 column with your tutorial!!!
ReplyDeleteThank you, thank you! I've been scouring the web looking for an html-for-dummies way to reformat my 2 column into a 3 column, and this was great. I was able to change the background with the help of a free background site, and now my blog's shaping up to be what I wanted.
ReplyDeleteMy only problem is that my Blog Description in the Header is left-justified, rather than centered. I can't seem to get that right. Any ideas?
Heather: you could try adding the style rules:
ReplyDeletemargin-left:auto;
margin-right:auto;
to the "#header .description" CSS class in your template.
Let me know if that centres it for you.
Thanks, Julian. That worked perfectly. I really appreciate the help!
ReplyDeletePleasure! :-)
ReplyDeleteyours is the best site of this type i've come across to date: easy to understand and delivering exactly what's promised.
ReplyDeletei haven't exactly mastered this yet, but that's likely because i'm sort of a nitwit!
thanks.
bingo! it worked out perfectly!
ReplyDeletea million thanks!
Worked great! Thanks!
ReplyDeletehey its working but the prob is mma blog post is not on the center.whats wrong??
ReplyDeletethank you very much for your easy to understand info! yours was by far the easiest to follow that i found.
ReplyDeletethanks again,
jenn
crazyblissblog
thank you for being the best at showing us how to make 3 columns for our blogs....
ReplyDeleteI do have a question....
I'm not sure my header is centered and I don't know if it's me or just the picture I used. could you help me with this ?
thanks again for being great !!!
oops...and that goes to my new blog
ReplyDeletewww.reallybeth.blogspot.com
Hi Julian,
ReplyDeletethis tutorial was most helpful, and I am glad you posted it! Thank you very much.
thank you for yr effort, this tutorial is very helpful. At last i managed to change my blog to 3 column.
ReplyDeleteThank you so much, now my issues is I can't get my header centered.
ReplyDeleteCan anyone help please?
http://mphoinix.blogspot.com
Thanks
Maggie
Hi Maggie,
ReplyDeleteTry adding the style rules:
margin-left:auto;
margin-right:auto;
to the "#header img" CSS class in your template.
Let me know if that centres it for you.
Thanks for this info. It was easy to follow and I now have a 3 column template. The only problem I have is that my right column is slightly cut off... how can I fix that? pcp_parker@msn.com.... any help would be greatly appreciated.
ReplyDeletehttp://vanillabeancafe.blogspot.com/
Thank you very very veryyy much!! I'm so happy it was so easy!! :)
ReplyDeleteYou rock! It looks awesome! I just have one question: how can I add highlight to author's comments on this one? Any help? Thanks!
ReplyDeleteThank you so much for the tutorial! It worked!!
ReplyDeleteI've been trying to do this forever and yours was the only tutorial that worked! Thank you so much!
ReplyDeletehello and thanks - easiest update I've found so far. I have one problem I can't figure out - getting this error message "The new widget id "NewProfile" is invalid for type: Profile"
ReplyDeleteI've gone over it and over it - can't get it . . .
Kristin
Hi Kristin,
ReplyDeleteYep it would appear Google changed something:
Try changing the new widget id from "NewProfile" to "Profile2"
Let me know if this works.
Cheers
Julian
Thanks for the great tutorial. One problem though. In my blog header, the blog description is not centred underneath the blog title anymore. I did move some of the side bar & main header widths to make the sidebars wider, but I don't think I changed anything to do with the header. I can't find where the code is to make it right. Actually I wouldn't know what to do anyway!
ReplyDeleteThanks
Hi Sam,
ReplyDeleteI'd like to help but it's impossible to know what's going on without seeing your expanded Blogger template.
Send me a copy and I'll take a quick look if you like.
Regards
Julian
Let me add my thanks in addition to everyone elses. Your site made this task the easiest of all (believe me, I tried a great many sites with instructions before I finally found yours)
ReplyDeleteI'll be back for more great tips!
Thanks again,
Let me add my thanks in addition to everyone elses. Your site made this task the easiest of all (believe me, I tried a great many sites with instructions before I finally found yours)
ReplyDeleteI'll be back for more great tips!
Thanks again,
Thankyou for that :-)
ReplyDeleteI'm glad you found it helpful!
I love the easy step by step instructions but when I went to save my template...I got this error
ReplyDeleteMore than one widget was found with id: Profile2. Widget IDs should be unique.
What now?
Thanks,
Jennifer
Hi Jennifer,
ReplyDeleteInstead of calling it Profile2, try re-naming it to "Profile3" - basically Blogger just needs a unique id (or name) for it.
Once you have installed the 3rd column, you can remove the new Profile widget anyway - I included it in the tutorial so people would have something visible in their new column when they first installed it.
Regards
Julian
ok....this makes me so nervous!
ReplyDeleteIt is asking me:
Widgets are about to be deleted
Please confirm that the following widgets should be deleted. All the widgets' configuration data will be lost.
Blog1
Do I confirm this? Will I lose any of my widgets in my current sidebar?
Thank you so much for all your help!!!
Jennifer
This is great! I changed "profile2" to 'profile3" and it worked.
ReplyDeleteThanks!
This comment has been removed by the author.
ReplyDeleteThis comment has been removed by the author.
ReplyDeleteThank you SO much for this very well written tutorial. I was able to implement a 3 column layout to my blog without any problems at all.
ReplyDeleteHi there! I'm having trouble with my blog. I want to post the map and the chat box on a 3rd column (instead of the map and chat box floating around..like when you look at my page the map is on the side but when you minimize it the map goes to the center..blocking my main posts) I couldn't find the wrap thing on my html code =( so I couldn't follow the instructions you wrote. I need help pleasee =)
ReplyDeleteIt actually worked! I've tried this before with other sites and it never worked.
ReplyDeleteMy posts dissapeared! Please help!
ReplyDeleteWow! Thank you so much for posting the easiest to follow instructions on the internet for making a three column template! You are a blessing!
ReplyDeleteBrilliant! Thanks so much! I wouldn't have had a clue where to start with making a three-column template, but now my blog is looking fab, and my sidebars (with the addition of a sparkling new one!) are looking much less cluttered! You are a star!
ReplyDeleteThank you so much for making this easy enough for me to do. I posted a link on my blog to your tutorial.
ReplyDeletethanks - it´s really well explained :)
ReplyDelete...hmm I did everything and then when I wanted to save my template it said: "More than one widget was found with id: Profile2. Widget IDs should be unique."
and I don´t know what to do... any idea? :o
thanks :)
Hey Jarka,
ReplyDeleteTry calling it Profile3 and see if that works.
It's temporary anyway - you can remove it once you have put some other widgets in the new sidebar using the Layout editor.
Let me know how you go.
Julian
Thanks so much! I used this to add a column and now have 3 columns! I have two small problems. First, my right column is slightly cut off (especially noticable at the top where "Subscribe to Krista Joy" is cut off. The other is that I now have no margin or space on the left side like I do on the right. Could you help me fix this?
ReplyDeleteAny help is greatly appreciated!!
My blog is: kristajoyonline.blogspot.com
My e-mail is: krista@joyscakesandconfections.com
Thanks!
Thank you very much! this is very helpful topic!
ReplyDeleteFor appreciation, i will promote your blog later in my blog!
Have a good day!
Thanks for this! I haven't tried it because I want to tweak the sizes. By my calculation, your pxs, with margins and padding, adds up to 1920px. Is this the total I should shoot for? And is it okay to go to 980 px for the outer wrapper if I adjust the other elements accordingly?
ReplyDeleteWill use your bg tutorial next!
Whoah! Nevermind. I see my mistake with the numbers. Will try it with outer wrapper at 980. I'll leave a link when I get it worked out!
ReplyDeleteThanks again.
Thank you very much for this super tutorial.
ReplyDeleteIt was really easy.
Damn, it nearly worked! I was so excited, been trying to get a 3rd column going for a long time. I've got the extra column on the left, however, my posts are missing. How frustrating. I'm going to put my old code in, but i'll keep this code and see if i can figure out was is wrong. Any ideas?
ReplyDeleteHi Shelley,
ReplyDeleteRe-read the "Final step - centering your blog posts" portion of this post.
Notice the line in CAPS that says - "(REMEMBER DO NOT REPLACE - ADD IT ABOVE)"
You replaced your #main-wrapper (where your posts go) with your new sidebar, try putting your new sidebar ABOVE the #main-wrapper instead.
Hope this helps
Julian
Hi! I did everything, but I was wondering how I could make the sidebars bigger, and the main blog area a little smaller? Thanks!
ReplyDeleteHi Denysia:
ReplyDeleteJust adjust the CSS in your template - #main-wrappper (is where your posts go), #sidebar-wrapper and #newsidebar-wrapper.
My post Troubleshooting 3 column Minima layout might help too.
Regards
Julian
Hi. Am I ever glad I found your site!! I'm new to blogging and am trying to customize my blog using the Minima as my main layout and adding backgrounds to it.
ReplyDeleteHow can I make sure my header image actually shows up? I have the box checked to show it instead of the title, but it won't show up. :(
Also, how do I make the background color of the sidebars different so that the words over there show up better? And how about making the sidebars wider so that banners, etc. don't get cut down the middle?
Hi Amy,
ReplyDeleteI'm not sure what's happening with your Header image - did you change something in your template? Delete any of the CSS style rules by mistake?
To change the color and widths you adjust the relevant CSS rules.
I will try to write a post on how to accomplish these common tasks in the next few days.
Cheers
Julian
OMG THANK YOU MAN YOU ROCK!!IL DEFENETLY RECCOMEND THIS SITE TO MY FRIENDS!!
ReplyDelete98David76:
ReplyDeleteThanks for the feedback mate. Glad you found it useful :-)
Cheers
Julian
Thank u so much.Very impressive as I'd try used intruction from other blogger but fail.Now,I can put a lot of info into my blog.Thank u again
ReplyDeleteThank you. This opens up so many possibilities!
ReplyDelete-Carrie
http://stxmomsblog.blogspot.com/
thank u very much...nice posting
ReplyDeletehttp://usb-wifi.blogspot.com
Thanks a lot, I have long to find a way to make a template 3 coloumn and finaly i found it here, i've used it on my blog.
ReplyDeleteAn excellent tutorial. I've just converted my wife's two column blog to a three column and it was a snip thanks to you. I didn't modify the header - waiting for a suitable picture. You should earn a good living doing this sort of wizardry.
ReplyDeletehttp://mumshealthcentre.blogspot.com/
Thank you so much!!! This was the best tutorial I've seen. I have spent the past week trying to make my blog 3 columns and nothing has worked. Your tutorial worked perfectly on the first try. I'm so happy! Thank you again!
ReplyDeleteHey could you please remove my comment off?
ReplyDeleteOMG THANK YOU MAN YOU ROCK!!IL DEFENETLY RECCOMEND THIS SITE TO MY FRIENDS!! please dont post this